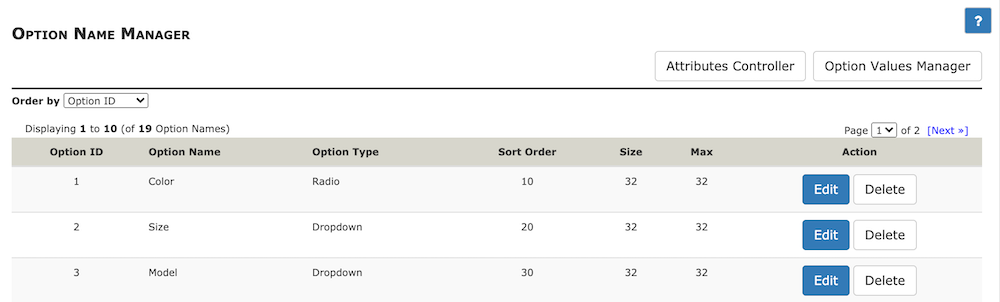
Option Name Manager
This page allows you to view, edit, add and delete option names.
Introduction
Before you can add attributes to your products in Admin - Catalog - Attributes Controller you need to create option names and where appropriate give the names option values.
Creating an Option Name

-
In the first text box you see
en: - type in the name of your attribute option. This will appear in your shop so should be informative to your customer.
-
In the second box
Order: - type in the sort order you want the attribute to appear under the product.
-
In the drop down box select which type of attribute you want.
- dropdown box
- requires option values you can set in Admin - Catalog - Option Value Manager
- text - a text area box
- does not require option values
- radio - a circle that allows customers to select an option value. The customer can only select a single option.
- requires option values you can set in Admin - Catalog - Option Value Manager
- checkbox - a square box that allows customers to select an option value.The customer can select multiple options.
- requires option values you can set in Admin - Catalog - Option Value Manager
- file - allows customers to upload files. File extensions can be set in admin configuration>maximum values> Allowed Filename Extensions for uploading
- does not require option values
- read only - this is for display purposes only and is not part of a calculation nor does it appear on the order. It is more or less an informational attribute that can be used with 1 to many products and then changed once to change on all products.
- requires option values you can set in Admin - Catalog - Option Value Manager
Click INSERT.
Option Name Settings
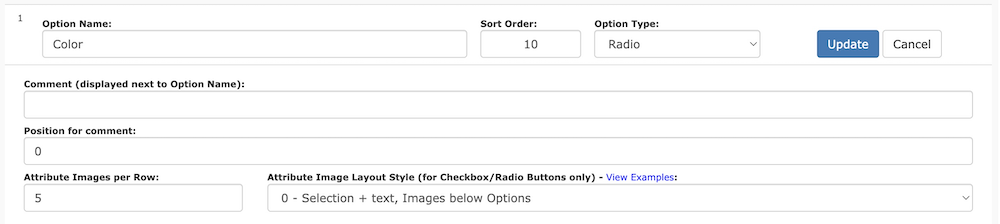
If you click edit next to the option name then you can add some settings.
- Comment - text that your customers will see above your option name so make it informative to them.
e.g. If the option name is to upload a file, tell your customer what file extensions are allowed.
-
Position for Comment - use 0 to display the comment above the field; use 1 to display the comment below the field. Note that this setting was introduced in version 1.5.8.
-
Rows - the number of rows you want your input/text area box to be.
-
Display Size - the size of the input/text area box on the screen your customers see.
-
Max Length - max number of characters including spaces that you want your customer to be able to type into your input/text area box.
The following settings are for image layout purposes
- Attribute Images per Row - how many images and option values you would like on each row.
- Attribute Style for Radio Buttons/Checkbox - the number you type in here corresponds to the numbers below.
- 0 = Images Below Option Names
- 1 = Element (check box/radio button), Image and Option Value
- 2 = Element(check box/radio button), Image and Option Name Below
- 3 = Option Name Below Element (check box/radio button) and Image
- 4 = Element (check box/radio button) Below Image and Option Name
- 5 = Element (check box/radio button) Above Image and Option Name
Click UPDATE.
You now need to set option values in Admin - Catalog - Option Value Manager before adding them to your products as attributes (unless you are only using TEXT and FILE).
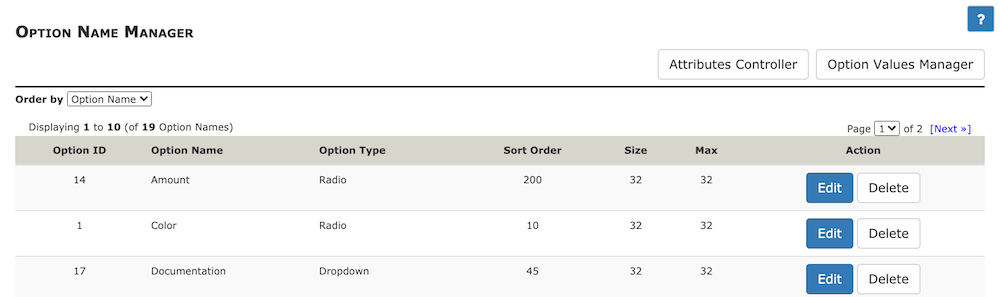
Sorting
Since Zen Cart 1.5.7, you have the option of sorting option names by ID as well as the default sort by name.